Joking aside, I was truly all-to-happy to plan this event since it was for my daughter's future brother-in-law. The only problem was that I only had six weeks in which to plan a party for 100 people. I had planned my daughter's graduation celebration for six months. But, because it was for people who are so close to my heart, how could I refuse?
I met with the graduate's father to get an idea of what kind of party he wanted to host for his son. This one was going to be pretty fun since the graduate was the high school valedictorian and the function would be an outdoor celebration with outdoor games and a live 80's band. Fitting 100 guests was a challenge which we remedied by using the garage and also renting a tent. We transformed the garage by covering the unfinished walls with white material to give a better backdrop.
I can't really explain from where my decor ideas usually come... they just pop in my head. I just begin to "see" the finished product. I Google images, but never quite end up doing what I find. I tend to go to my local dollar store, scrapbook shop, Walmart, and Hobby Lobby and see what is available and then build around cool things I find.
For my daughter's graduation, we ordered a huge banner with her picture. She had three graduation open houses in which the banner was displayed. For the first open house (which was her actual high school graduation, since she was home schooled for high school, and was a very formal celebration with only 25 guests), we hung it high to make a statement. For the church open house and my extended family's open house, we hung the banner lower and used it as a guest book to sign. Everyone LOVED going up and writing on it. I thought that it would be a great idea to do for this valedictorian, too.


The graduate's school colors were black and red, which I love together, so it made planning fun. So off to Hobby Lobby and the scrapbook store I went. I found these cool foil sprays and I just started imagining the larger centerpieces.

I found the mini diplomas, "Congrats Grad" cake topper, and mortarboards at our cake supply store and attached them using glue spots to red bamboo skewers I found at Hobby Lobby. The plastic tubs were at our local Dollar Tree store. I shoved the foil spray pic into a piece of floral foam, double-sided-taped it into the bottom of the plastic bin, then dumped landscaping rocks around and on top of the foam to hold it in place. I then covered the foam with red foil and black crinkle shred. It was great to be planning a party with a red color theme since the stores were filled with Fourth of July flavor.
I had to make several smaller centerpieces. I found glass cylinders at The Dollar Tree and continued with the black crinkle and red foil shred. I filled the cylinders with glass beads for weight, but covered the inside bottom half with black glitter card stock. I added a finishing touch of chevron ribbon to the center.


I purchased graduation-themed die cuts at my local scrapbook store. I hope to one day own a
Cricut machine in order to make my own. I attached the die cuts to white card stock, then red card stock. to make them pop. I added red and black glitter stars and thought they turned out fabulously. I placed red table cloths on the tables and tied black tulle around the center to look like a runner. Not only was it cool, but when a breeze would blow, the table cloth stayed put.
Cricut machine in order to make my own. I attached the die cuts to white card stock, then red card stock. to make them pop. I added red and black glitter stars and thought they turned out fabulously. I placed red table cloths on the tables and tied black tulle around the center to look like a runner. Not only was it cool, but when a breeze would blow, the table cloth stayed put.
The graduation boards are always the most fun, but also the most time consuming to plan and execute. I always love seeing the end result and watching guests' reactions to them. I love making boards that are over-the-top. I always let the boards tell the grad's life story with milestone events and include the people that are most important in their lives. This first board took me eight hours just to put it together. That does not include the picture choosing process. It probably took me about a week just to plan it, then a full day to put it together.


I made an additional board that commemorated his high school and year of graduation and featured him delivering his valedictory address. It was simple, but really impressive.

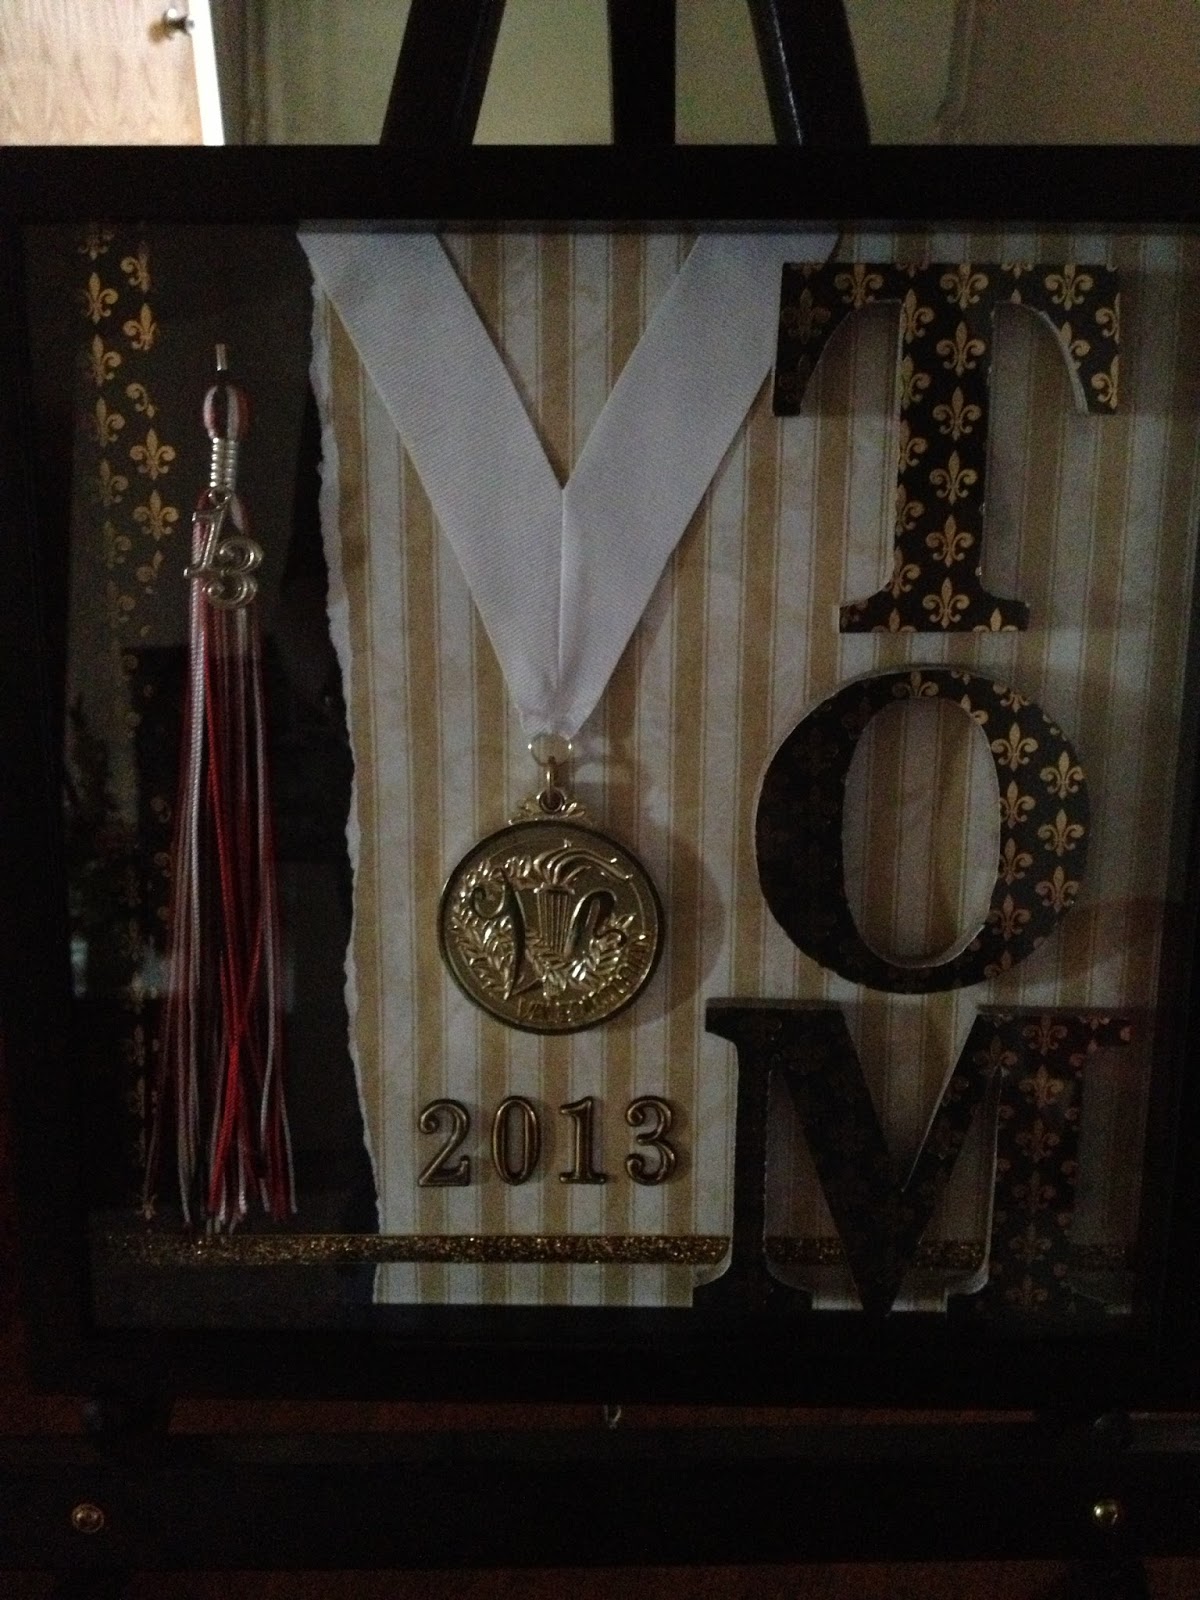
I also wanted to showcase his valedictory medal. I created a shadow box in a scrapbook page style and included his graduation tassel. He was amazed and appreciated such a beautiful keepsake.
The main display table...


I made two banners from scrapbooking card stock. I traced each letter with letter templates and cut out each letter by hand and added two colors of card stock behind. I laced them together with paper twine and we stapled them directly to the garage wall. One read "Valedictorian" and the other expressed the sentiment, "Good Luck". I draped one above the main table and the other above the buffet table.

The grad's father also asked me if I would make the desserts for the function. (Okay, kill me. haha) He had tasted the cake I had made for my daughter at her graduation. Instead of a cake, I chose a cupcake tower for this event because of the number of guests and the ease of individual servings. I also chose cherry cheese tortes since the red would fit in beautifully with the color palette. I put the cupcakes in red cupcake liners with white butter creme icing and topped them with black grad theme picks. The tortes were placed in gold foil wrappers which was a salute to his gold valedictorian medal. When placed on the red foil table cloth, the gold foil actually took on a red look and was fantastic!


As a finishing touch to the walls, I filled in bare spots with a "clothes line" of photos on either side of the room.

And, of course, the band was a huge hit. Unfortunately, we had a threat of rain and had to move them into the garage. But, it worked out well. Those that danced moved just outside the door and had a great time.

 |
| The Valedictorian and His Event Planner :) |
 |
| The Grad's Dad... giddy with how the event turned out. He said, "This was WAY more than we expected." |
 |
| His Beautiful Mother and I
To God Be the Glory. Amen.
|
Awseome article, I am a big believer in writing comments on sites to inform the blog writers know that they've added something of great benefit to the world wide web!
ReplyDeleteWow! Thank you so much for taking the time to let me know that. I deeply appreciate it! It feels so good to know that I am helping others. Friends and family have told me that I need to go into business doing this. Maybe someday... :)
ReplyDeleteYou did an awesome job. Everything looked great! Cricut machines are the best. Super easy to use. My daughter has been using ours since she was 10.
ReplyDeleteI loved your graduation decorations as I was looking for some "boy" decorations. Thanks for sharing them. Can you tell me where you got the red metallic stars on a stick for your centerpieces?
ReplyDeleteHello, Christine! Thank you so much and I am glad this helped you! The website for the glitter stars is: http://www.dazzlelace.com/packagingsupplies/decorations.htm They are 50 cents each. I wish you a fabulous party!
DeleteThank you so much Leslie Ann ---I appreciate it! I will go place my order now and be ready to go!
DeleteThese are great ideas. I really love your centerpieces. Thanks for sharing.
ReplyDeleteWhat a GREAT job!!!! I love so many of your ideas! Thank you for sharing!
ReplyDelete